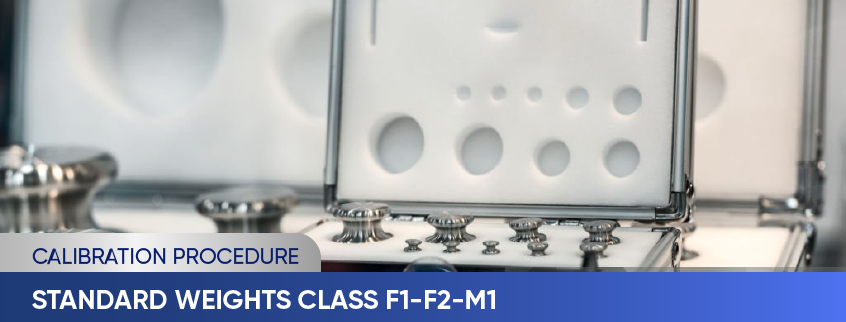
Weights of classes CCX F1-F2-M1 calibration
Main contents
- What is a standard weight?
- How to classify standard weights?
- Terminology explained
- Calibrate standard weights F1, F2 and M1
- Calibration procedure
Measuring the mass of a single object or multiple objects necessitates the use of scales and weights, which are critical tools. Their role in determining mass is crucial. Therefore, it's vital to maintain their stability and reduce potential errors.
1. What is a standard weight?
A weight is an object with a certain mass that is used to determine the mass of other objects through balance. Standard weights are measuring instruments used to verify and calibrate scales and weights. Standard weights have many different levels of accuracy, depending on the purpose of use, there will be an appropriate choice.
2. How to classify standard weights?
Classification of standard weights needs to comply with Vietnam's measurement standards: Use E1 weights as the national standard (secondary standard) according to Decision 14/2006/QD-TTg dated January 17, 2006) approved in 10 standards Country, in which the 1 kg weight number 982/2 has a mass of 1,000 000 275 kg, its accuracy is 2.10-8.
.jpg)
Standard weights are used in conjunction with scales or other devices; force machines, pressure machines, and other machines..... Standard weights and weights used with the scale (except for specialized weights) are manufactured according to regulations on shape, size, material... and about the level of accuracy. Other weights are manufactured according to user requirements in terms of both shape and accuracy.
According to OIML R76-1, weights from about 1 mg - 5000 kg are classified according to the following accuracy levels: including E0, E1, E2, F1,F2, M1, M2, M3
- E1: to link with national standards and to calibrate and verify E2 results.
- E2: for calibration and verification of F1 results, can be used with level 1 scales.
- F1: for calibration and verification of F2 results, used with level 1 and 2 scales.
- F2: for calibration and verification of M1 and M2 results, used with level 2 scales.
- M1: to calibrate and verify the M2 result, accompanied by a level 3 scale.
- M2: for calibration and verification of M3 results, commonly and widely used in commerce.
- M1-2; M 2-3 from (50–5000) kg used with large precision scale 3.
3. Terminology explained
The conventional mass of a weight is the mass of a standard weight with a density of about 8000 kg/m³ in balance with that weight in air at a temperature of 20 ºC and the density of the air is 1.2 kg/m³.
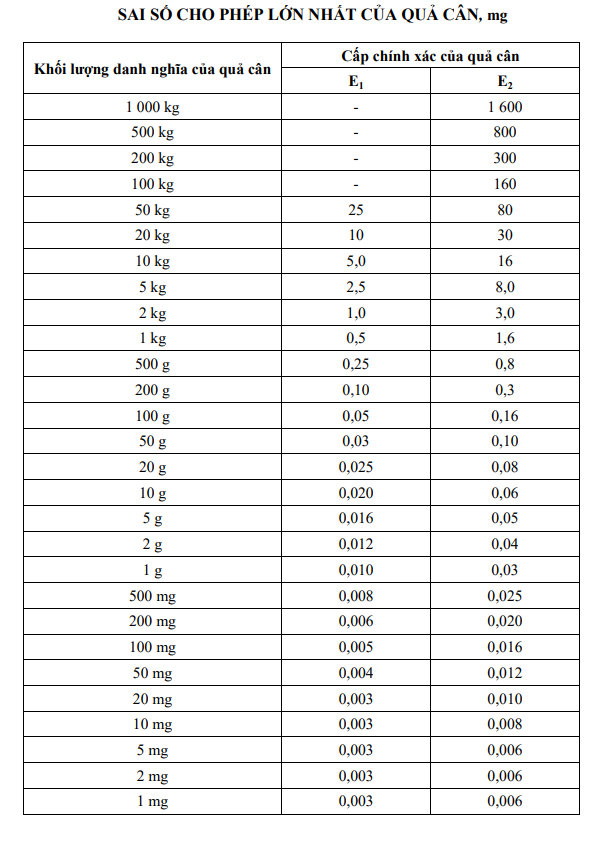
Maximum allowable error is also known as: MPE. This is the maximum prescribed difference between the nominal mass and the conventional mass of the weight. The maximum allowable error of precision weights F1, F2 and M1 is shown specifically in the table below:
4. Why should you calibrate the weights?
- Save costs, avoid waste, rework, or product recall.
- Reliable measurements.
- Compliance with internal and external audits.
- Detect degraded equipment. All equipment degrades over time, and critical components are subject to mechanical stress or wear and tear.
- Improve processes and profits.
.png)
5. Calibration procedure
- Measurement standards
- Calibrate F1 precision weights according to technical documents
- Calibrate F2 precision weights according to technical documents
- Calibrate M1 precision weights according to technical documents
- Other measuring devices
- The comparison scale has a measuring range suitable for the weight to be calibrated
- Thermometer
- Hygrometer
- The calibration location must be bright enough, apart from wind and heat sources, and under no vibration
- Depending on the accuracy level, the environmental conditions during calibration must meet the requirements as stated in the technical documents.
- Turn on the power to dry the electronic comparison scale for at least 30 minutes or according to the manufacturer's requirements
- Stable temperature for standard weights and weights that need to be calibrated for a time not less than the value specified in the technical documents.
- Units of weight are kilograms, grams, milligrams
- Check the nominal volume
- The weight must have a smooth, scratch-free surface; Casting weights must be thoroughly cleaned, free of sharp edges, sand burns, and painted or coated.
- The geometric shape meets the requirements as shown in the technical documents
- There are signs to distinguish weights in the same set.
- Check specific gravity
- Check the adjective for F1 precision weights
- Choose a comparison method
- Select the number of iterations
- Conduct repeated measurements
- Calculate and process data
- Calculate the measurement of uncertainty during weighing
- Calculate the measurement of uncertainty of the mass of the standard weight
- Calculate the measurement of uncertainty due to the instability of the standard weight
- Calculate the measurement of uncertainty due to air propulsion
- Calculate the measurement of uncertainty due to the sensitivity coefficient, resolution, and eccentricity of the comparison scale
- Calculate the measurement of uncertainty extended measurement
- After calibration, the weight is stamped and issued a calibration certificate with the calibration results.
- Recommended calibration cycle: 01 year
To consult and request a quote on our calibration services, please kindly contact us via the following information:
LABORATORY: DONG TAM MEASUREMENT AND TECHNICAL TRADING SERVICE CO., LTD
Address: No.57-59 Street 11, Binh Hung Residential Area, Binh Hung Commune, Binh Chanh District, Ho Chi Minh City
TEL: 028 375 83 869 - Hotline: 0909 347 891 (Mr. Lâm)
Email: info@dongtam-mes.vn
Relative post | Xem tất cả
- Stopwatches calibration
- ORP meter calibration
- Hydrometer calibration
- Analytical and Technical balance calibration
- Analytical and Technical balance verification
- Spring dial scales verification
- Spring dial scales calibration
- Bench weight scale verification
- Bench weight scales calibration
- Platform scales verification
- Platform scales calibration
- Chlorine meter calibration









 Legal
Legal  Call: 0283.7583869
  Search for Certificate
  Contact