Analytical and Technical balance calibration

Key Contents
- What are analytical and technical balances?
- Analytical and Technical balances calibration
- Structure and operating principle
- Why should you calibrate analytical and technical balances?
- Calibration procedure - Analytical and technical balances
Thanks to the advancements in technology, more and more manufacturing and business enterprises are opting for analytical balances and technical scales to measure their products, goods, and materials. These instruments are highly accurate and capable of measuring with minimal to negligible errors.
1. What are analytical and technical balances?
Analytical and technical balances are high-precision measuring devices. According to OIML R-76, analytical balances have accuracy class I, and technical balances have accuracy class II.
Both balances are non-automatic weighing instruments* and are commonly called 'scales/balances'.
*Non-automatic weighing instruments require human intervention during weighing.
Analytical and technical balances are widely used in the pharmaceutical, food, industrial, and agricultural sectors, manufacturing companies, factories, laboratories, research centers, hospitals, schools, metrology institutes, and testing laboratories.
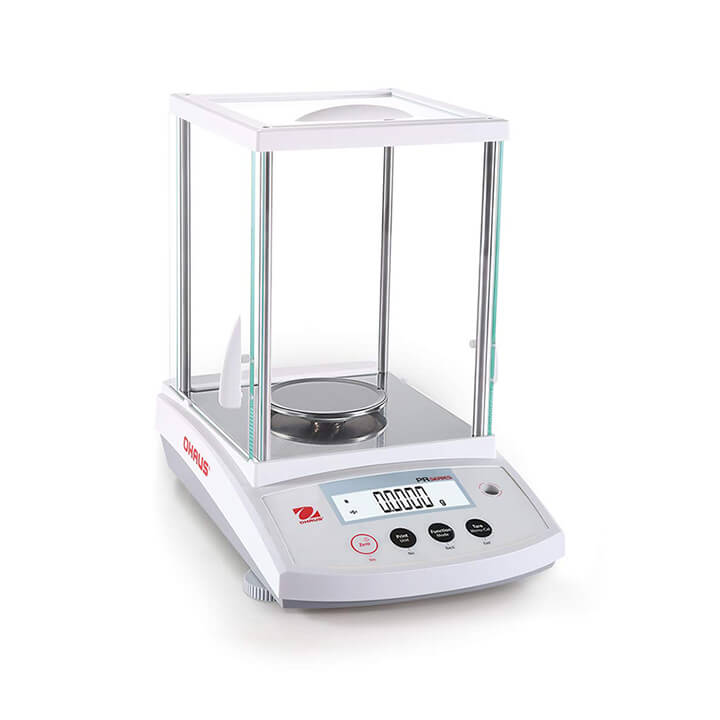
An analytical balance is a type of electronic scale with very high accuracy, often used to measure the mass of small objects, liquids, particles, or powders. Analytical balances can read weights from 0.1 mg or more and have many different odd numbers to suit different levels of measurement. Analytical balances are often used in various industries such as laboratories, hospitals, research institutes, factories, and companies specializing in microscopic samples.

1.3 What is the technical balance?
Technical balances, often known as precision balances, belonging to the electronic balances line with the ability to weigh accurately from 0.1 to 0.0001g. This type of balance is frequently used in professions and sectors requiring great precision and specialization such as gold, silver, gems, accessories, testing...
.jpg)
1.4 The difference between analytical and technical balances
Analytical balances and technical balances are both types of electronic balances. However, there are some key differences between the two:
Accuracy: Analytical scales have higher accuracy than technical scales, with a minimum error of 0.001g or 1mg. Technical balances have lower accuracy than analytical balances, with a minimum error of 0.1g or 10mg.
Applications: Analytical balances are used in laboratories, hospitals, research and development facilities, etc. to weigh small samples that require high accuracy. Technical balances are used in industries, manufacturing, commerce, etc. to weigh larger objects with lower accuracy.
Display: Analytical balances have a large LCD screen with more information and functions. Technical balances have a small LCD screen with less information and fewer functions.
Price: Analytical balances are more expensive than technical balances .
2. Structure and operating principle
2.1 Structure
Analytical and technical balances are two types of high-precision weight-measuring devices widely used in various industries. However, their structure and operating principles have some differences:
Analytical balance: Typically has a complex structure with components such as weight sensors, a complex electronic system, and the ability to connect to computers or other devices for data processing. The components include:
- Analytical balance casing: Protects the internal parts of the balance and the sample from the wind.
- Weight sensor block (Load Cell): Placed under the weighing plate to receive and convert weight signals into electrical signals.
- Signal amplifier – ADC circuit: Amplifies the signal and converts the analog signal into a digital signal.
- Central processing unit: Processes the digital signal from the ADC, stores data, adjusts zero, and tares the balance.
- Display: Displays the weight result of the object to be weighed.
- Buttons: To set the measurement modes.
- Power supply: Uses direct power, and converts AC power into DC power.
Technical balance: Usually only includes basic components such as a weight sensor and a simple control system:
- Electronic circuit: Includes ADC (or analog to digital converter) and other control chips, the circuit receives the value from the load cell, then calculates and gives the result.
- Load cell: A sensor device used to calculate the necessary weight to help the electronic scale display the weight of an object as an accurate number.
2.2 Operating principle
Both types of balances rely on the deformation of a component called a load cell when subjected to a load. A load cell can be used to alter a metal bar's resistance, which allows for the calculation of the object’s mass. There are two common types of load cells: metal load cells (arm) and optical load cells (optomechanical).
3. Analytical and Technical balance calibration
Like any measuring instrument, analytical and technical balances also need to be calibrated regularly to ensure measurement accuracy.
Balance calibration is the activity of comparing and quantifying actual weight indicators with a standard weight of a specific level placed on the scale pan. Error is defined as the discrepancy between the measured value (the screen-displayed indicator) and the actual value (the reference weight).
4. Why should you calibrate analytical and technical balances?
Balance reliability decreases over time. This is due to corrosion and damage caused by constant usage, as well as external influences such as mechanical vibration or use in explosive environments. This can result in fast depreciation of the weighing equipment over time. Regularly scheduled balance calibration combined with regular periodic testing greatly enhances scale life and accuracy.
Scale calibration should be performed at least once a year or more frequently to ensure the accuracy and reliability of measurement results.
5. Calibration procedure - Analytical and technical balances
This summarizes the calibration process for analytical balances and technical reference scales, as described in technical literature. ĐLVN 16: 2021. The actual calibration process may differ from the general standard's method (internal process).
- When calibrating analytical balances: Use a set of standard weights that have an accuracy class of E2, F1, or higher;
- When calibrating technical balances: Use a set of standard weights that have an accuracy class of F1, F2 or higher;
- Other means: A thermometer.
- Ensure the calibration place is dry, clean, and well-lit, with the temperature falling within the specified working range provided by the scale manufacturer. Temperature fluctuations need to be within:
- ± 2 ºC for analytical balance
- ± 5 ºC for technical scales
- Humidity: (40 - 80) %RH
- External factors such as wind, heat, electromagnetic field, and grid voltage should not ineterfere with the calibration results.
- Furthermore, the scale table should be sturdy to prevent any vibration sources from affecting the scale.
- Clean the weighing location, both inside and outside the weighing chamber.
- Check the balance and adjust it if necessary to make it neat and balanced.
- Turn on the power to dry the electronic scale for at least 30 minutes or according to the manufacturer’s requirements.
- Open the weighing chamber door to balance the temperature between the inside and outside space.
- Place the standard weights next to the scale that needs to be calibrated and stabilize the temperature of the standard weights for a time not less than the value specified in Table 3 (Technical Document ĐLVN 16: 2021).
- Ensure that the scale has all the necessary parts and accessories.
- Verify that the indicator of the scale is clear and reads accurately.
- Check that the scale has a label with the following information at minimum:
- Scale symbol or manufacturing facility
- Number of pounds
- Maximum weight level (Max)
- Check division value
- Exact level
- Division value.
- Ensure that the load-receiving part of the scale is sturdy and not entangled by other parts of the scale.
- Verify that the scale has a sealing position that prevents the scale’s accuracy adjustment.
- Use the accompanying set of weights for scales. The set of weights must have an accuracy level appropriate to the scale and a valid calibration certificate.
- Increase the starting load 3 times, starting load level is equivalent to (80 ~ 100)% Max. During the initial loading process, ensure that the scale operates normally.
To check and measure the scale, follow the order of content, methods, and requirements below:
- Check angular deviation (eccentricity).
- Check repeatability.
- Check accuracy.
For scales with multiple weighing ranges, each weighing range must be checked separately according to the requirements above.
Recommended calibration cycle: 01 year
To consult and request a quote on our calibration services, please kindly contact us via the following information:
LABORATORY: DONG TAM MEASUREMENT AND TECHNICAL TRADING SERVICE CO., LTD
Address: No.57-59 Street 11, Binh Hung Residential Area, Binh Hung Commune, Binh Chanh District, Ho Chi Minh City
TEL: 028 375 83 869 - Hotline: 0909 347 891 (Mr. Lâm)
Email: info@dongtam-mes.vn
Relative post | Xem tất cả
- Stopwatches calibration
- ORP meter calibration
- Hydrometer calibration
- Analytical and Technical balance verification
- Spring dial scales verification
- Spring dial scales calibration
- Bench weight scale verification
- Bench weight scales calibration
- Platform scales verification
- Platform scales calibration
- Chlorine meter calibration
- Total suspended solids (TSS) meter calibration


 Legal
Legal  Call: 0283.7583869
  Search for Certificate
  Contact